
If your car, truck, mower, or other small engine has a rough idle, hard start, or misfire, the spark plug is a sensible place to inspect. Learning how to check a spark plug with a multimeter takes only a few minutes once the plug is out. The key is knowing what the meter can tell you and what it cannot.
A spark plug has an internal electrical path from its top terminal to the center electrode. Many modern plugs also have an internal resistor. That resistor helps reduce radio and electrical noise. Because plug designs vary, a resistance reading must be judged against the correct specification rather than a made-up universal number.
One common mistake is to treat a good ohms reading as proof that the plug is good. It is not. A multimeter checks electrical resistance, while a spark plug must also survive heat, pressure, vibration, and high ignition voltage. For a complete diagnosis, combine the meter test with a visual check and, when needed, a proper spark test.

What a Multimeter Can Tell You About a Spark Plug
Before learning how to check a spark plug with a multimeter, it helps to know what the test measures. A digital multimeter can measure resistance through the plug’s internal electrical path. This can help find an open circuit, a short, or a resistance value that does not match the plug specification.
The test does not measure the strength of the ignition spark. The ignition system can create very high voltage, while a normal multimeter is not designed to measure that voltage at the spark plug gap. For that reason, do not place a standard multimeter across the spark gap and expect a useful spark test.
Many resistor spark plugs have a resistance element inside the plug. The exact value depends on the plug design. Some plugs may show low resistance, while resistor plugs can show a much higher value, so the part number and service data matter.

- ✦ What the test can find
It can reveal an open internal circuit, an unusual resistance reading, or a possible short to the plug shell.
- ✦ What the test cannot prove
It cannot prove that the plug produces a strong spark at the correct gap when the engine is under compression.
- ✦ Why specifications matter
Spark plug designs differ. Use the plug maker’s data or the vehicle service information instead of relying on one general ohms value.
How a Spark Plug Works
The ignition system sends high voltage to the plug’s top terminal. That voltage travels through the plug and reaches the center electrode. The voltage then jumps the small gap between the center electrode and the ground electrode to ignite the air-fuel mix.
The ceramic insulator helps keep the voltage on the correct path. The metal shell connects the plug to engine ground. A resistor, when fitted, helps limit electrical noise without stopping the plug from doing its main job.
- ✦ Center electrode
This carries the ignition voltage toward the firing end of the plug.
- ✦ Ground electrode
This provides the return path and forms the spark gap with the center electrode.
- ✦ Insulator
The ceramic body helps keep high voltage from leaking to the metal shell.
Tools and Safety Steps Before You Start
You do not need a large tool kit for how to check a spark plug with a multimeter. A basic digital multimeter with an ohms setting is enough for the electrical check. You will also need the correct spark plug socket and the tools required to remove the plug from your engine.
Let the engine cool before removing a spark plug. A hot aluminum cylinder head can make plug removal unsafe and can also increase the risk of thread damage. Keep the work area clean so dirt does not fall into the plug hole after the plug is removed.
Follow the vehicle service manual for ignition system steps. On a modern coil-on-plug engine, the coil and connector sit directly over the plug. On older engines, plug wires may connect the plugs to a distributor or ignition coil.

- ✦ Digital multimeter
Use a meter with an ohms or resistance setting. Auto-ranging meters make the test simple, but a manual range can also work.
- ✦ Spark plug socket
Use the correct size socket so the plug shell is not damaged during removal.
- ✦ Safety glasses
Wear eye protection when cleaning around the plug area or using compressed air.
- ✦ Vehicle service information
Use the correct plug type, resistance data, gap, and installation torque for the engine.
Turn the Engine Off and Let It Cool
Never remove a spark plug from a running engine. Ignition systems can produce dangerous high voltage. Wait until the engine is cool enough to work on safely, then follow the proper procedure for disconnecting the ignition component from the plug.
Do not test an exposed plug by holding it against the engine while someone cranks the engine unless you are using a proper spark-testing method and the service procedure allows it. A dedicated spark tester is safer and gives a better indication of ignition performance.
- ✦ Avoid live ignition parts
Do not touch ignition wires, coils, or plug terminals while the engine is running.
- ✦ Keep debris out
Clean around the plug before removal so dirt does not enter the cylinder.
How to Check a Spark Plug With a Multimeter Step by Step
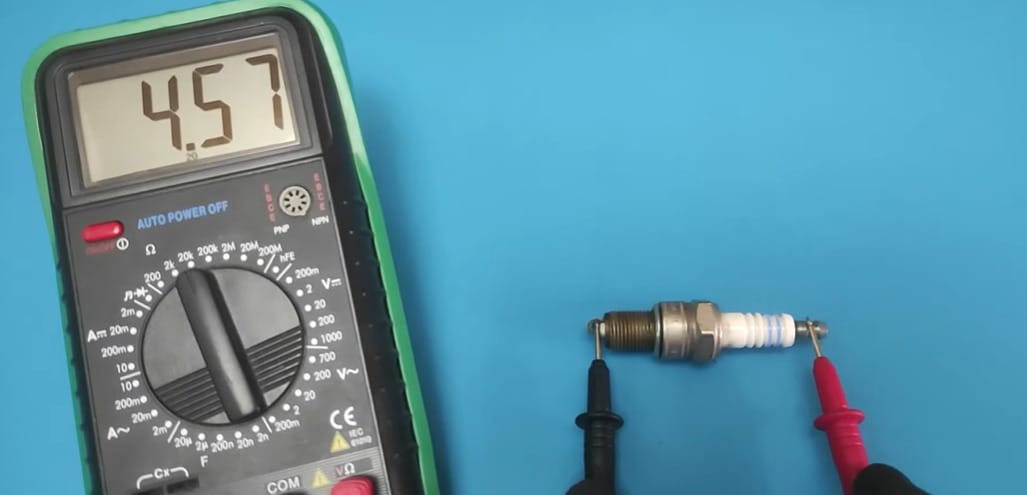
Now you can perform the main test. The basic method for how to check a spark plug with a multimeter is simple: remove the plug, select resistance mode, place the probes on the correct points, and compare the reading with the correct specification.
Keep the plug clean while testing. Oil, carbon, or moisture on the contact points can make probe contact poor. If the reading changes when you move a probe, clean the contact area and test again.
Do not assume that a low or high number alone proves the plug is bad. First check the plug’s part number and its published resistance range. Then repeat the measurement to make sure the result is stable.

- ✦ Step 1: Remove the plug
Remove the ignition boot or coil, then remove the spark plug with the correct socket. Keep each plug matched to its cylinder if you are checking several plugs.
- ✦ Step 2: Set the meter to ohms
Select the resistance setting marked Ω. If your meter has manual ranges, choose a range that can display the expected plug resistance.
- ✦ Step 3: Check the meter first
Touch the two probes together. A very low reading shows the probes and meter are making contact. Note the small resistance from the test leads if your meter displays it.
- ✦ Step 4: Touch the plug contacts
Place one probe on the top terminal and the other on the center electrode contact at the firing end, using a clean metal contact point.
- ✦ Step 5: Read the resistance
Hold the probes steady and wait for the reading to settle. Record the value before moving the probes.
- ✦ Step 6: Compare with the specification
Compare the reading with the plug maker’s or vehicle maker’s stated value. If it is outside the allowed range, the plug may have an internal fault.
How to Check the Meter Before Testing the Plug
A quick meter check prevents many false results. Touch the two probes together and watch the display. A normal digital meter should show a very low resistance value, often close to zero, although the exact number depends on the meter and leads.
If the display shows an open circuit with the probes touching, check the leads, sockets, and meter setting. A poor lead can make a good spark plug look faulty.
- ✦ Low reading with probes together
This usually shows that the meter and leads have a working electrical path.
- ✦ OL or open with probes together
Check the meter setting and test leads before testing the spark plug.
Where to Put the Multimeter Probes
For a basic resistance test, one probe goes on the plug’s top terminal. The other probe needs to contact the center electrode’s electrical path at the firing end. This can be awkward on some plugs, so use a clean and stable contact point.
Do not place the second probe on the metal shell when you are trying to measure the plug’s internal resistor. The shell is ground. Measuring terminal to shell is a different check and should not be confused with the main resistance test.
- ✦ Main resistance path
Measure from the top terminal to the center electrode path.
- ✦ Shell check
A separate terminal-to-shell test can help look for an unwanted low-resistance path, but it does not replace the main plug resistance test.
How to Read Spark Plug Resistance Results
Reading the number is the part that often causes confusion. When learning how to check a spark plug with a multimeter, remember that resistance is not the same as spark quality. A plug can have an acceptable resistance reading and still have worn electrodes, a cracked insulator, heavy deposits, or another problem.
Resistor plugs are designed to have measurable resistance. Non-resistor plugs may show a much lower reading. The correct value depends on the exact plug design, so the plug number is more useful than a general internet rule.
If one plug in a matching set has a very different reading from the others, that difference can be useful. Still, confirm the expected specification before replacing parts. A difference between plugs is a clue, not a final diagnosis.

- ✦ Expected resistance
A stable reading within the manufacturer’s stated range supports the plug’s internal electrical continuity.
- ✦ Very high or open reading
An open or far-too-high reading can point to a broken internal connection or resistor fault, depending on the plug design.
- ✦ Very low reading
A low value may be normal for some plugs, but it can indicate a fault if the plug is designed to have a much higher resistance.
- ✦ Unstable reading
A reading that jumps around can come from poor probe contact, dirt, a damaged terminal, or an internal problem.
Why You Should Not Use One Universal Ohms Number
Spark plugs are not all built the same way. Some use a resistor to reduce electrical interference, while other designs have little or no internal resistance. Even resistor designs can use different resistance values.
That is why a claim such as “every good spark plug should read exactly X ohms” is not a safe diagnostic rule. For how to check a spark plug with a multimeter correctly, always identify the exact plug and use its approved specification.
- ✦ Check the part number
Use the number printed on the plug or its packaging to find the correct technical data.
- ✦ Use vehicle data
The owner’s manual or service information can help confirm the correct plug and related specifications.
A Good Resistance Reading Does Not Mean a Good Spark
The plug must fire across a small gap while exposed to high temperature and cylinder pressure. A basic multimeter does not reproduce those conditions. This is the main limitation of the resistance test.
If the resistance looks normal but the engine still misfires, move to the next diagnostic step. Inspect the plug condition, plug gap, ignition coil or wire, fuel system, and other causes based on the engine and its fault symptoms.
- ✦ Normal resistance
This means the internal electrical path looks reasonable. It does not prove the plug will fire correctly in the engine.
- ✦ Misfire remains
Use a proper spark tester and continue with a wider ignition and engine diagnosis.
Inspect the Spark Plug Before You Replace It
A visual inspection adds useful information to the multimeter test. Look at the ceramic insulator, center electrode, ground electrode, and metal shell. Signs such as heavy carbon, oil, wet fuel, damaged electrodes, or a cracked insulator can point to problems that resistance alone will not show.
Spark plug color can also offer clues about engine operation, but it should not be used alone to diagnose a modern engine. Fuel control, oil use, ignition faults, and engine conditions can all affect the plug. Compare the plug with the maker’s inspection guidance when possible.
If the electrode is badly worn or the plug is physically damaged, replacement may make more sense than spending time on additional resistance tests. Use the correct plug type and the correct gap for the engine.

- ✦ Cracked ceramic
A crack in the insulator can allow electrical leakage and can make the plug unsafe to use.
- ✦ Worn electrodes
Heavy electrode wear can change the spark gap and make ignition less reliable.
- ✦ Carbon deposits
Heavy dark deposits can affect spark performance and may also point to an engine or fuel-related issue.
- ✦ Oil or fuel on the plug
Wet or oily deposits can be a clue to a wider engine problem, so replacing the plug may not fix the root cause.
- ✦ Damaged ground electrode
A bent, burned, or badly worn ground electrode can change the intended spark gap.
Check the Spark Plug Gap Separately
A multimeter does not measure the spark plug gap. Use a suitable gap gauge or feeler gauge and compare the result with the engine maker’s specification. The correct gap can vary by engine and plug application.
Do not force the electrode into position. If adjustment is allowed for the plug type, make small changes with the correct spark plug tool. Some modern plugs are not intended for rough adjustment, so follow the plug maker’s instructions.
- ✦ Use a gap gauge
Measure the physical distance between the center and ground electrodes.
- ✦ Use the correct specification
Do not copy the gap from another engine or another spark plug.
What to Do If the Multimeter Test Looks Normal
This is where good diagnosis matters. If you follow how to check a spark plug with a multimeter and get a normal resistance reading, but the engine still runs poorly, do not automatically declare the spark plug good. The resistance test checks only one part of the plug’s condition.
Start with the simplest checks. Look for damage, contamination, an incorrect gap, a loose terminal, or a problem with the coil or plug wire. On a coil-on-plug engine, inspect the coil boot and connector as well.
A proper spark tester can check whether the ignition system can produce a visible spark. If the spark is present, the fault may be elsewhere, such as fuel delivery, air supply, compression, timing, or an engine control issue.
- ✦ Check the ignition coil
Look for damage, poor connections, or a coil fault when the engine uses coil-on-plug ignition.
- ✦ Check the plug wire
If the engine uses plug wires, test them according to the manufacturer’s resistance limits and inspect them for heat or physical damage.
- ✦ Use a spark tester
A dedicated tester is better than a multimeter for checking whether an ignition system can produce a spark.
- ✦ Scan for trouble codes
On modern U.S. vehicles, an OBD-II scan can help identify stored or pending misfire and ignition-related codes.
- ✦ Consider fuel and compression
A normal spark plug does not rule out injector, fuel pressure, air, valve, or compression problems.
When to Replace the Spark Plug
Replace the plug when it fails the manufacturer’s electrical specification, has clear physical damage, has badly worn electrodes, or has reached the service interval set for the vehicle. Follow the vehicle or plug maker’s guidance rather than replacing plugs on a fixed schedule that does not fit the engine.
When installing a new plug, use the correct part number and gap. Start the plug by hand to reduce the chance of cross-threading, and tighten it to the specified torque when the manufacturer provides a torque value.
- ✦ Use the correct plug
Match the plug to the engine application rather than choosing one based only on size.
- ✦ Use the correct torque
Follow the engine or spark plug manufacturer’s installation torque specification.
When a Professional Diagnosis Makes Sense
A recurring misfire can damage other engine parts if you keep driving without finding the cause. If a new plug does not solve the problem, or if the engine has severe symptoms, use the vehicle’s diagnostic information and consider professional testing.
A technician can test ignition output, fuel delivery, compression, sensor signals, and other systems that a simple multimeter spark plug test cannot cover.
- ✦ Persistent misfire
A repeated or severe misfire deserves a full diagnosis instead of repeated plug replacement.
- ✦ Severe running problem
Stop and seek help if the engine runs very poorly, overheats, loses power suddenly, or shows other serious symptoms.
Common Mistakes When Testing a Spark Plug
Most mistakes with how to check a spark plug with a multimeter come from using the wrong test point or expecting the meter to do more than it can. A resistance test is useful, but it is only one part of spark plug diagnosis.
Another common mistake is using a generic resistance number found online. Spark plug designs vary, so the same reading can be normal for one plug and wrong for another. Always identify the exact plug before making a replacement decision.
It is also easy to overlook the rest of the ignition system. A bad coil, damaged wire, poor ground, loose connector, or fuel problem can create symptoms that look like a bad spark plug.

- ✦ Testing a hot plug
Wait for the engine and plug to cool before removal and testing.
- ✦ Testing the wrong points
For the main resistance test, measure the internal path from the terminal to the center electrode path.
- ✦ Using a universal resistance rule
Do not assume every spark plug should show the same number of ohms.
- ✦ Confusing resistance with spark
A good resistance reading does not prove that the plug produces a strong spark under engine conditions.
- ✦ Ignoring the plug gap
A correct resistance reading cannot tell you whether the physical spark gap is correct.
- ✦ Skipping visual inspection
Cracks, worn electrodes, deposits, and other visible faults can be missed if you use only the multimeter.
A Practical Diagnostic Sequence
A simple order can save time. First, confirm the complaint and check for diagnostic codes. Next, inspect the plug and ignition parts, then perform the resistance test, check the gap, and use a spark tester when needed.
This approach prevents parts swapping. It also helps you separate a faulty spark plug from a wider ignition or engine problem.
- ✦ Start with symptoms
Note whether the engine has a hard start, rough idle, loss of power, or a specific-cylinder misfire.
- ✦ Inspect before measuring
Look for physical damage, deposits, and poor connections.
- ✦ Measure resistance
Use the correct ohms test and compare the result with the specification.
- ✦ Confirm the spark
Use a dedicated spark tester when resistance and symptoms do not agree.
- ✦ Check other systems
If ignition checks pass, continue with fuel, air, compression, and engine control diagnosis.