
A spark plug can look fine and still have an internal fault. That is why a quick resistance test can help when an engine runs rough, misfires, or starts hard. The test is simple, but the result needs context.
If you want to know how to test a spark plug with a multimeter, start with the plug removed from the engine. Set the meter to resistance, place one probe on the center contact and the other on the terminal, then note the reading. The key point is that there is no single resistance number that fits every spark plug.
A multimeter test is only one part of a spark plug check. It can find some open or abnormal circuits, but it cannot tell you everything about the plug’s ability to fire inside a running engine. For a complete diagnosis, also inspect the plug, check the gap, and follow the vehicle maker’s test procedure.

What Does a Multimeter Test on a Spark Plug?
A multimeter measures electrical resistance. Resistance shows how much a part resists the flow of electric current. On many modern spark plugs, an internal resistor helps limit electrical noise and protects parts of the ignition system.
When you test a spark plug with a multimeter, you are mainly checking the electrical path through the plug. A normal reading suggests that the internal path is not open. An open circuit or an unusual reading can point to an internal problem.
The test does not measure spark strength. A plug may show a reasonable resistance reading and still fail under the high voltage and pressure found inside an engine. This is one of the most important limits to understand before replacing parts.
- ✦ What the test can show
It can show whether the plug has an electrical path and whether its resistance appears reasonable for that plug type.
- ✦ What the test cannot show
It cannot fully prove that the plug will produce a strong spark under real engine conditions.
- ✦ Why specifications matter
Spark plugs use different designs, so resistance values can vary. Use the plug maker’s or vehicle maker’s specification when one is available.
Why Some Spark Plugs Have Internal Resistors
Many resistor spark plugs contain a small resistance element inside the plug. It helps reduce electrical interference from the ignition system. This design is common in modern vehicles and electronic systems.
Because resistor plugs and non-resistor plugs can have different readings, never judge a spark plug from a generic resistance number alone. The correct specification for the exact plug is the better guide.
- ✦ Resistor plug
It contains an internal resistor and normally shows measurable resistance between the center electrode and terminal.
- ✦ Non-resistor plug
It may show very low resistance because it does not use the same internal resistor design.
Tools and Safety Steps You Need Before Testing
The test needs only a few basic tools. A digital multimeter is the main tool, and a spark plug socket is useful if you need to remove the plug from a vehicle. A clean work area also helps keep dirt out of the plug hole.
Work on a cool engine. Do not touch ignition parts while the engine is running, and keep the ignition system disabled when removing a plug. High-voltage ignition systems can cause a painful shock.
If you are working on a lawn mower, motorcycle, ATV, or other small engine, follow its service instructions. The same basic resistance test may apply, but the correct spark plug type and resistance specification can differ.
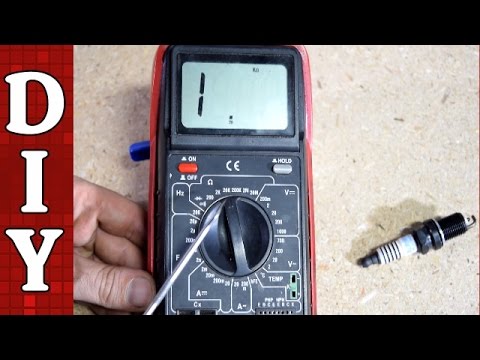
- ✦ Digital multimeter
Use a meter that has an ohms or resistance setting. Auto-ranging meters are easy to use, but a manual-range meter also works.
- ✦ Spark plug socket
Use the correct socket if the plug must be removed from the engine.
- ✦ Eye protection
Safety glasses help protect your eyes from dirt and debris during engine work.
- ✦ Clean cloth
Use it to wipe dirt from the plug before testing and to keep debris away from the cylinder.
Do You Need to Remove the Spark Plug?
For a reliable resistance test, remove the spark plug from the engine. Testing it while it remains connected can give a confusing reading because the ignition circuit and other components may affect the measurement.
Disconnect the plug wire or ignition coil as directed by the vehicle service procedure. Remove the plug with the correct socket, and keep dirt from falling into the open plug hole.
- ✦ Let the engine cool
A cool engine lowers the risk of burns and makes plug removal safer.
- ✦ Keep the plug hole clean
Blow or brush away loose dirt before removing the plug if the service instructions allow it.
How to Test a Spark Plug With a Multimeter Step by Step
Now you can perform the actual test. If you are learning how to test a spark plug with a multimeter for the first time, take your time and make sure the probes touch clean metal.
The most common test checks resistance from the top terminal to the center electrode. This checks the electrical path through the plug’s internal parts.

- ✦ Step 1: Remove the spark plug
Remove the plug from the engine and wipe away dirt or oil. Do not test a plug that is still connected to the ignition system.
- ✦ Step 2: Set the multimeter
Turn the meter to resistance mode, shown by the ohm symbol Ω. Select a suitable range if your meter is not auto-ranging.
- ✦ Step 3: Check the meter leads
Touch the two probes together. The meter should show a very low value or a value close to its normal lead resistance.
- ✦ Step 4: Touch the first probe to the terminal
Place one probe on the metal terminal at the top of the spark plug.
- ✦ Step 5: Touch the second probe to the center electrode
Place the other probe on the center electrode at the firing end. Make sure both probes make firm contact with clean metal.
- ✦ Step 6: Read the display
Wait for the number to settle. Record the resistance reading in ohms.
- ✦ Step 7: Compare the result
Compare the reading with the specification for the exact spark plug. If you have several matching plugs, comparing their readings can also provide useful clues.
How to Place the Multimeter Probes
One probe goes on the top terminal. The other goes on the center electrode at the tip. Keep the probes steady while you read the display.
Do not place both probes on the outer metal shell and expect a useful resistance reading. The test is meant to check the path through the plug, not simply the metal body.
- ✦ Top probe
Touch the metal terminal where the plug wire or ignition connection attaches.
- ✦ Bottom probe
Touch the center electrode at the firing end of the plug.
How to Read and Interpret the Resistance Result
The number on the meter is only useful when you know what the spark plug should measure. There is no universal resistance value for every plug. Some plugs use a resistor, while others do not.
An open circuit reading, often shown as OL on a digital meter, means the meter does not detect a normal electrical path. That can indicate a broken internal connection. However, you should confirm the plug type and test method before calling it defective.
A very different reading from the maker’s specification can also be a warning sign. If you have multiple identical plugs, a large difference between one plug and the others may be worth investigating.
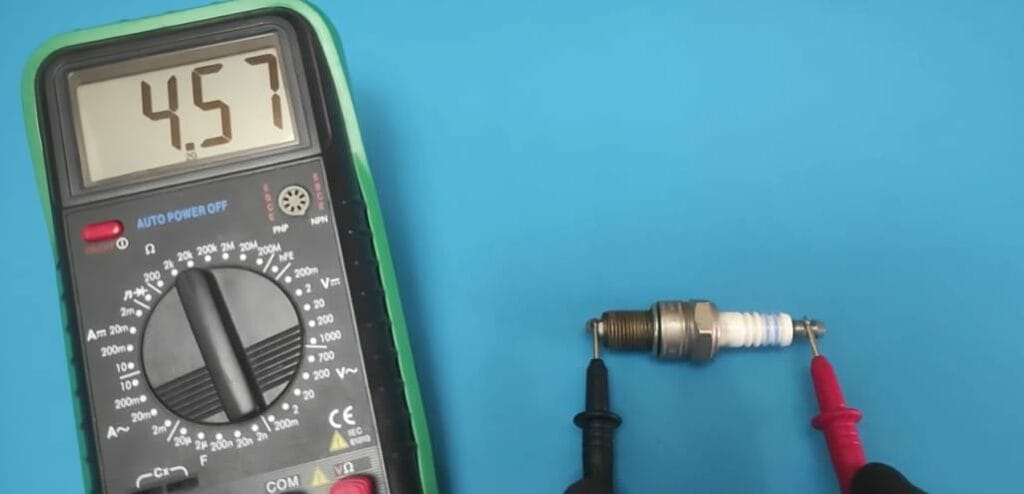
- ✦ Normal reading
The measured resistance falls within the specification for the exact plug.
- ✦ OL or infinite resistance
The meter sees no normal electrical path. This can indicate an open internal circuit on a plug that should have continuity.
- ✦ Very low resistance
A very low value may be normal for some non-resistor plugs, but it may be unexpected for a resistor plug.
- ✦ Unusually high resistance
A value above the stated specification can point to an internal fault, but confirm the plug specification before replacing it.
What Resistance Should a Spark Plug Have?
The correct resistance depends on the spark plug design. Many resistor plugs show resistance in the kilo-ohm range, while some non-resistor plugs show very little resistance.
Do not use a fixed number from a general online guide as the final test. Check the exact plug number and its manufacturer’s data whenever possible. This prevents a normal plug from being rejected because it does not match an unrelated plug design.
- ✦ Check the part number
Use the number printed on the plug or the number listed for your engine.
- ✦ Use maker data
Follow the resistance range or test method given by the plug maker or vehicle maker.
- ✦ Compare matching plugs
If several identical plugs are available, compare their readings under the same test conditions.
How to Test a Spark Plug With a Multimeter When the Reading Looks Wrong
If the reading seems wrong, do not replace the plug at once. First check the meter, probe contact, plug type, and test points. A poor probe connection can create a false result.
Repeat the test with clean contact points. You can also test the meter leads by touching them together and checking that the meter responds as expected.
If the same plug still gives an open or abnormal reading, compare it with a known-good plug of the same part number. This simple comparison can help separate a plug problem from a testing problem.

- ✦ Clean the contact points
Dirt, oil, carbon, or oxidation can make probe contact poor and affect the reading.
- ✦ Check the meter setting
Make sure the meter is set to resistance rather than voltage, current, or continuity-only testing.
- ✦ Test the meter leads
Touch the probes together and check whether the meter shows a low resistance value.
- ✦ Test a matching known-good plug
A comparison plug can show whether the original reading is unusual.
Common Testing Mistakes
One common mistake is testing the plug while it is still connected to the ignition system. Another is using the wrong terminals. Both can lead to readings that do not mean what you think they mean.
Another mistake is assuming that any resistance means the plug is good. Resistance is only one part of the diagnosis. A spark plug can pass an ohms test and still have a cracked insulator, worn electrode, damaged firing end, or poor performance under load.
- ✦ Testing a hot plug
Allow the engine to cool before removing and testing the plug unless the service procedure says otherwise.
- ✦ Using the wrong range
A manual-range meter set too low can display an overload condition even when the plug is fine.
- ✦ Using dirty probes
Poor contact can make the reading unstable or misleading.
- ✦ Ignoring the plug specification
Different spark plugs can have different resistance designs, so a generic number can lead to a wrong diagnosis.
How to Check a Spark Plug Beyond the Multimeter Test
Knowing how to test a spark plug with a multimeter is useful, but a full inspection gives you much more information. Look at the firing end, ceramic insulator, electrodes, and shell. Signs of heavy wear, cracks, oil, or unusual deposits can help explain an engine problem.
Check the spark plug gap against the engine maker’s specification. Do not assume that a new plug has the correct gap for every application. The correct gap can vary by engine and plug type.
If the engine has a misfire, also consider the ignition coil, plug wire where used, fuel system, air leaks, compression, and engine control system. Replacing a spark plug will not fix a problem caused by another part.

- ✦ Inspect the ceramic
Look for cracks, chips, or other visible damage. Do not use a plug with a damaged insulator.
- ✦ Inspect the electrodes
Look for worn, rounded, damaged, or badly eroded electrodes.
- ✦ Look for unusual deposits
Oil, heavy carbon, fuel deposits, or other residue may provide clues about the engine or combustion problem.
- ✦ Check the gap
Measure the gap and compare it with the correct specification for the engine and plug.
- ✦ Check the ignition system
If the plug tests normally but the engine still misfires, inspect the coil, plug wire, connectors, and related ignition parts as appropriate.
Can a Spark Plug Pass a Multimeter Test and Still Be Bad?
Yes. A resistance test does not reproduce the conditions inside a running engine. The plug must work at high voltage and under pressure, and a simple ohms test cannot fully simulate those conditions.
For this reason, use the multimeter as a screening tool. If the plug has a normal resistance reading but the engine still has a misfire, continue with a wider ignition and engine diagnosis.
- ✦ Electrical resistance is only one check
A normal resistance reading does not prove that the plug performs correctly under load.
- ✦ Physical condition matters
A cracked ceramic insulator or badly worn electrode can cause problems even when resistance looks normal.
When Should You Replace a Spark Plug?
Replace a spark plug when it fails the maker’s inspection criteria, has clear physical damage, or reaches the service interval specified for the engine. Do not rely on appearance alone. A plug can look clean and still have an internal issue.
If one plug has an abnormal resistance reading while matching plugs are within specification, replacement may be appropriate after you confirm the test. Use the correct plug part number and heat range for the engine.
When replacing plugs, avoid forcing a plug into the cylinder head. Use the correct socket and follow the specified installation method and torque. Over-tightening or cross-threading can damage the plug or cylinder head.

- ✦ Replace a damaged plug
A cracked insulator, damaged terminal, or badly damaged electrode is a reason to stop using the plug.
- ✦ Follow the service interval
Use the vehicle or engine manufacturer’s maintenance schedule as the starting point.
- ✦ Use the correct replacement
Match the plug type, part number, reach, heat range, and other required specifications.
- ✦ Install it correctly
Keep the threads clean and use the specified installation procedure and torque.
When a Multimeter Is Not Enough
If the resistance test looks normal but the engine still has a fault, stop treating the spark plug as the only possible cause. Modern ignition systems have several parts that can create similar symptoms.
A proper diagnosis may require a spark test tool, scan tool, compression test, ignition coil checks, or other tests. Follow the service information for the specific vehicle rather than changing parts at random.
- ✦ Persistent misfire
A continued misfire can come from ignition, fuel, air, compression, or control-system problems.
- ✦ No-start condition
A no-start problem may need checks of fuel, ignition power, timing, compression, and engine controls.
- ✦ Repeated plug failure
If new plugs fail again soon, look for the underlying engine or ignition problem instead of repeatedly replacing plugs.
How to Test a Spark Plug With a Multimeter: Quick Checklist
If you need a short version, the process is easy to remember. Remove the plug safely, set the meter to ohms, check the electrical path, and compare the result with the correct specification.
The most important step is interpreting the number correctly. A resistance value has meaning only when you know what the exact spark plug should show.
- ✦ 1. Cool the engine
Work on a cool engine and follow the vehicle’s safety procedure.
- ✦ 2. Remove the plug
Disconnect the ignition connection and remove the plug with the correct tool.
- ✦ 3. Set the meter to ohms
Choose the resistance function and the correct range if needed.
- ✦ 4. Check the probes
Touch the probes together to confirm the meter and leads respond normally.
- ✦ 5. Test the plug
Touch one probe to the top terminal and the other to the center electrode.
- ✦ 6. Record the reading
Write down the resistance shown on the meter.
- ✦ 7. Compare with the specification
Use the exact spark plug or vehicle specification rather than a generic resistance value.
- ✦ 8. Inspect the plug
Check the ceramic, electrodes, deposits, and gap before deciding whether the plug is faulty.