
A spark plug can look fine and still cause a rough idle, hard start, misfire, or poor engine performance. That is why a good test checks more than the outside of the plug. For most drivers and DIY mechanics in the U.S., a basic visual check plus a spark tester gives useful information without much cost.
If you are learning how to test spark plug condition at home, start with safety and the vehicle manual. Spark systems use high voltage, and gasoline vapors can ignite. Do not test a plug by holding it in your hand or by making an improvised spark gap near fuel. Use an approved tester and follow the engine maker’s instructions.

What Does a Spark Plug Do?
A spark plug creates the spark that starts combustion in a gasoline engine. High voltage travels through the ignition system and reaches the plug. The voltage then jumps the small gap between the electrodes and helps ignite the air and fuel mixture.
When the plug is worn, fouled, damaged, or set with the wrong gap, the spark may become weak or fail. This can lead to a rough idle, hard starting, hesitation, poor power, or an engine misfire. A bad plug is not the only possible cause, so testing helps narrow the problem.
The exact plug type and gap depend on the engine. Always use the specification for your vehicle or equipment. A plug that fits the threads may still be the wrong plug for the engine.
- ✦ Creates the ignition spark
The plug provides the controlled gap where the ignition voltage can jump.
- ✦ Helps the engine run smoothly
A clean plug with the correct gap can support stable combustion and easy starting.
- ✦ Shows clues about engine problems
The plug’s deposits and wear can sometimes point to issues with fuel, oil, ignition, or combustion.
When Should You Test a Spark Plug?
Test a spark plug when an engine is hard to start, runs rough, misfires, or loses power. Testing also makes sense when you are doing routine maintenance and want to confirm that an old plug is still usable.
If the engine suddenly develops a misfire, do not assume the spark plug is the cause. A faulty ignition coil, plug wire, injector, vacuum leak, fuel problem, or compression issue can create similar symptoms.
- ✦ Hard starting
A weak or missing spark can make a gasoline engine difficult to start.
- ✦ Rough running
A misfiring cylinder may cause shaking, hesitation, or an uneven idle.
- ✦ Routine service
A plug inspection can help you find wear or damage before it causes a larger problem.
What You Need to Test a Spark Plug
You do not need a large tool set for a basic spark plug check. A spark plug socket, ratchet, spark plug gap gauge, clean cloth, and approved spark tester cover most basic checks. A digital multimeter can also help when the plug maker gives a resistance specification.
Before removing the plug, let the engine cool. Clean dirt from around the plug so debris does not fall into the cylinder. If you work on a car, follow the service manual for coil packs, plug wires, and electrical connectors.
A spark tester is the safer choice for checking whether the ignition system can produce a spark. Do not rely on an improvised test that holds a loose plug against the engine while someone cranks it.

- ✦ Spark plug socket
Use the correct size socket to remove and install the plug without damaging the ceramic body.
- ✦ Spark plug gap gauge
Use it to compare the electrode gap with the engine maker’s specified gap.
- ✦ Approved spark tester
A spark tester lets you check ignition output without using your body as part of the electrical path.
- ✦ Digital multimeter
Use a multimeter for resistance checks when the plug specification provides a useful resistance range.
Safety Before You Start
Turn the engine off and let it cool before removing a plug. Keep fuel and fuel vapors away from sparks, flames, heaters, and other ignition sources. Work in a well-ventilated area.
High-voltage ignition systems can cause a painful shock. Keep hands away from exposed ignition parts while the engine is cranking. For small engines, use the manufacturer’s approved spark tester rather than removing the plug and creating an open spark.
- ✦ Avoid fuel vapors
Do not perform spark tests where spilled gasoline or fuel vapor is present.
- ✦ Keep clear of moving parts
Keep clothing, hair, tools, and hands away from belts, fans, pulleys, and other moving parts.
- ✦ Follow the manual
Use the vehicle or equipment service instructions when they differ from a general testing procedure.
How to Test a Spark Plug Step by Step
If you want to know how to test spark plug condition, use a simple sequence. Start with a visual inspection, then check the gap and resistance when appropriate. Finish with an approved spark test if you need to confirm that the ignition system can produce a spark.
Do not skip the visual check. A cracked insulator or badly damaged electrode is enough reason to replace the plug. Testing a visibly damaged plug can waste time because the physical damage already shows that the part is not fit for normal use.

- ✦ Step 1: Turn off and cool the engine
Make sure the engine is off and cool enough to service safely. Disconnect the ignition connection as directed by the service manual.
- ✦ Step 2: Clean around the plug
Remove loose dirt around the plug before taking it out. This helps keep debris from entering the cylinder.
- ✦ Step 3: Remove the plug
Use the correct spark plug socket and remove the plug carefully. Keep the plug with its cylinder position if you plan to compare several plugs.
- ✦ Step 4: Inspect the plug
Look for cracked porcelain, damaged threads, melted or badly worn electrodes, heavy deposits, oil fouling, and unusual discoloration.
- ✦ Step 5: Check the gap
Measure the gap with a spark plug gauge and compare it with the specification for your engine.
- ✦ Step 6: Check resistance if required
Use a multimeter only when the plug maker provides a resistance specification that applies to that plug.
- ✦ Step 7: Use a spark tester
Connect the approved tester as directed and crank the engine or operate the starter according to the service procedure. A visible spark in the tester shows that the ignition system is producing a spark at the tester.
- ✦ Step 8: Decide what the result means
A damaged plug should be replaced. If the plug looks sound but the spark test fails, continue testing the ignition coil, plug wire, connections, and other parts of the ignition system.
How to Test Spark Plug by Visual Inspection
Remove the plug and inspect the ceramic insulator and electrodes under good light. Look for cracks, chips, heavy carbon, wet fuel, oil, or an electrode that has worn away. These signs can help explain why the engine runs poorly.
A light amount of normal deposit does not always mean the plug has failed. The key is to compare its condition with the engine maker’s guidance and with the condition of the other plugs. A single plug that looks very different can point to a cylinder-specific problem.
- ✦ Cracked porcelain
Replace a plug with cracked or chipped ceramic because the insulation can no longer be trusted.
- ✦ Worn electrode
A badly worn electrode can change the gap and make reliable ignition harder.
- ✦ Heavy deposits
Thick deposits can interfere with normal spark behavior and may point to another engine issue.
- ✦ Wet plug
Fuel or oil on the plug can indicate flooding, oil entry, or another condition that needs diagnosis.
How to Test Spark Plug Gap
The spark plug gap is the space between the center electrode and the ground electrode. A gap that is too wide or too narrow can change ignition performance. Measure the gap with a gauge and compare it with the exact specification for your engine.
Do not guess the correct gap from another vehicle or from a generic chart. Specifications vary by engine and plug. Some fine-wire, platinum, iridium, or twin-tip plugs also need special care because bending the electrode can damage the plug.
- ✦ Use the correct specification
Find the gap in the owner’s manual, service manual, or the plug maker’s application data.
- ✦ Measure before adjusting
Check the actual gap instead of assuming a new plug has the exact gap your engine needs.
- ✦ Avoid force
Do not bend fine electrodes or use a tool in a way that can crack or damage the plug.
How to Test a Spark Plug With a Multimeter
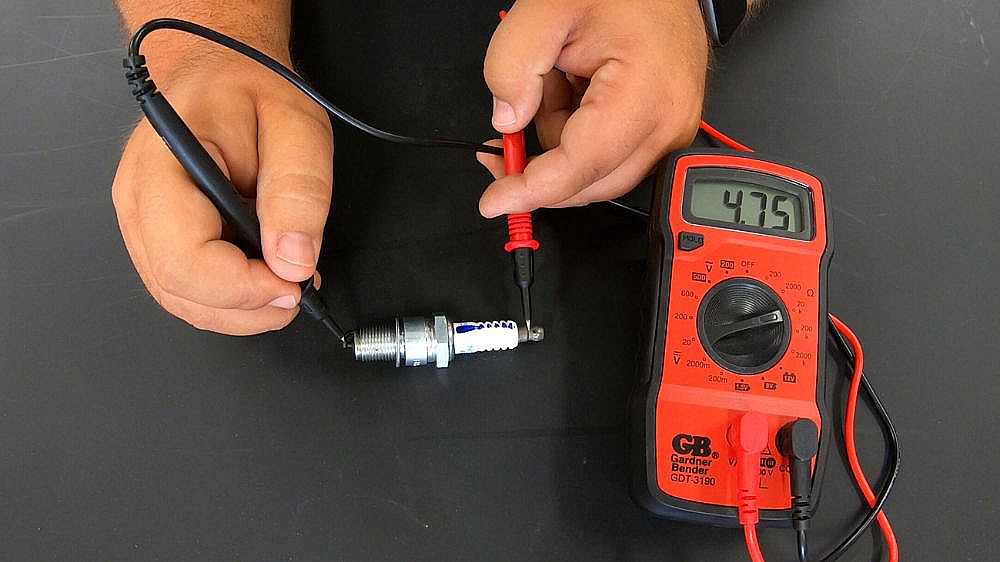
A multimeter can test electrical resistance through a spark plug when the plug uses a resistor and the manufacturer gives a resistance specification. This is a useful bench test, but it has limits. A normal resistance reading does not prove that the plug will fire correctly under engine pressure and temperature.
To begin, set the multimeter to resistance mode. Touch one probe to the center terminal and the other probe to the metal shell or ground electrode, following the plug maker’s specified test method. Compare the reading with the published specification for that exact plug.
If the meter shows an open circuit when a measurable resistance should be present, or the reading is far outside the specified range, the plug may be faulty. Do not use a random resistance number as a universal pass or fail rule because different plug designs can have different internal resistance.
- ✦ Set the meter to ohms
Choose the resistance setting and make sure the meter works correctly before testing the plug.
- ✦ Test the correct points
Place the probes on the terminals specified for the plug design and keep the contact clean.
- ✦ Compare with the specification
Use the plug maker’s resistance range rather than a generic value found online.
- ✦ Know the limit of the test
A resistance test cannot fully reproduce the heat, pressure, voltage, and vibration found inside a running engine.
Can a Multimeter Tell If a Spark Plug Is Bad?
Sometimes, but not by itself. A multimeter can find an electrical problem in a plug that has a specified resistance value, yet a plug can still fail under real ignition conditions even when its resistance looks normal.
That is why the best answer to how to test spark plug condition is to use more than one check. Combine visual inspection, gap measurement, the correct resistance test when applicable, and an approved spark test.
- ✦ Good resistance reading
This supports the idea that the internal resistor or circuit is within its stated range, but it does not prove the plug will fire correctly under load.
- ✦ Open circuit
An open reading can indicate a failed internal connection when the plug should have measurable resistance.
- ✦ Resistance far outside spec
A large difference from the maker’s stated range can be a reason to replace the plug.
How to Test a Spark Plug With a Spark Tester
A spark tester is one of the most useful tools for ignition troubleshooting. It places a controlled test gap in the ignition circuit. This can show whether the ignition system is producing a spark without asking you to hold a live ignition part.
Connect the tester exactly as its instructions show. For many systems, the tester connects between the ignition lead and a suitable engine ground. Then crank the engine or use the starting procedure specified for the equipment.
A visible spark in the tester means the ignition circuit is producing a spark at that test point. If no spark appears, check the tester connection first. If the result remains negative, inspect the ignition coil, plug wire or boot, wiring, grounds, switches, and other parts of the ignition system.

- ✦ Use an approved tester
A purpose-built spark tester is safer and more repeatable than an improvised spark test.
- ✦ Check the connection
A loose clip or poor ground can create a false no-spark result.
- ✦ Interpret the result carefully
A no-spark result does not automatically prove that the spark plug itself is bad because other ignition parts may be at fault.
- ✦ Follow the service manual
Some engines require a specific tester or test method, so use the procedure for your exact engine.
What a Spark Test Can and Cannot Tell You
A spark test can confirm that an ignition circuit produces a spark at the tester. It can help separate an ignition problem from problems in fuel delivery or other engine systems.
However, a spark test does not prove that the plug is perfect in every condition. A plug may fire in one test but still misfire under compression or when the engine is hot. If symptoms remain, continue the diagnosis instead of replacing parts at random.
- ✦ It can confirm spark output
The tester provides a clear way to see whether the ignition circuit produces a spark.
- ✦ It can narrow the fault
A no-spark result can shift attention toward the ignition system instead of fuel or air.
- ✦ It is not a complete engine test
Spark alone does not prove correct fuel delivery, compression, timing, or plug performance under every condition.
How to Tell If a Spark Plug Is Bad
The easiest way to identify a bad spark plug is to combine physical inspection with test results and engine symptoms. Do not judge the plug from one symptom alone. A rough engine can have many causes.
A plug with cracked porcelain, a badly damaged electrode, or severe fouling should usually be replaced. If several plugs show unusual deposits, look for the reason instead of simply installing new plugs and stopping the diagnosis.
For a modern U.S. vehicle, you should also consider diagnostic trouble codes and the vehicle’s ignition system design. Coil-on-plug engines, for example, may not use traditional plug wires. The repair process should match the system in the vehicle.

- ✦ Cracked ceramic
Cracks or chips can allow the high-voltage current to travel in an unwanted path.
- ✦ Severely worn electrodes
Heavy electrode wear can change the gap and reduce reliable ignition.
- ✦ Heavy carbon or oil deposits
Strong deposits can interfere with ignition and may signal another engine problem.
- ✦ Failed applicable resistance test
A resistance reading outside the plug maker’s specification can support replacement when that test applies.
- ✦ No spark during a proper test
A no-spark result requires further ignition diagnosis because the plug may not be the only failed component.
Spark Plug Color and Deposits
The appearance of a used spark plug can provide clues, but plug color is not a stand-alone diagnosis. Modern fuel systems, engine designs, fuel types, oil use, and operating conditions can all affect deposits.
Look for patterns across all cylinders. One unusual plug may point toward a problem in that cylinder, while similar deposits on every plug may suggest a condition affecting the whole engine.
- ✦ Dry black deposits
Dark deposits can be linked with incomplete combustion or other operating conditions, but further diagnosis is needed.
- ✦ Wet fuel
A fuel-wet plug can occur after flooding or repeated cranking without normal combustion.
- ✦ Oil deposits
Oil on a plug can point toward oil entering the combustion chamber and should be assessed with other engine symptoms.
- ✦ Very light or damaged appearance
An unusually light, overheated, or damaged plug needs comparison with the manufacturer’s service information.
Common Spark Plug Testing Mistakes
Many DIY testing errors come from using the wrong specification or treating one test as a complete diagnosis. Spark plugs look simple, but ignition systems can vary widely between engines.
A common mistake is replacing every part that seems related to a misfire. A better approach is to test one part at a time and use the results to guide the next step. This can save money and prevent a good ignition coil, wire, or plug from being replaced unnecessarily.
Another mistake is using an old generic gap value. Always use the specification for the exact engine and plug. Some modern plugs also have fine electrodes that can be damaged by rough adjustment.
- ✦ Using a random gap value
Spark plug gaps vary by engine and plug. Use the exact specification for the application.
- ✦ Testing with fuel nearby
Spark can ignite gasoline vapors, so keep ignition testing away from fuel spills and vapors.
- ✦ Holding a live ignition lead
Do not use your body as a test path. Use an approved tester.
- ✦ Trusting resistance alone
A normal resistance reading does not prove that the plug will perform correctly under engine conditions.
- ✦ Ignoring the rest of the ignition system
A no-spark condition can come from the coil, wiring, switch, ground, plug wire, or another component.
- ✦ Replacing parts without testing
Use test results to guide repairs instead of replacing several parts at once.
When Should You Replace Instead of Test?
If the plug has cracked porcelain, badly damaged electrodes, or other clear physical damage, testing usually adds little value. Replace it with the correct plug and follow the specified installation procedure.
For a plug that simply looks dirty or old, testing can help you decide what to do. Keep in mind that spark plugs are service items, and the recommended replacement interval varies by engine, plug type, and manufacturer.
- ✦ Replace damaged plugs
Physical damage is a strong reason to install a correct replacement rather than trying to restore the plug.
- ✦ Follow the service interval
Use the vehicle or equipment manual for the recommended replacement schedule.
- ✦ Use the correct replacement
Match the plug type, heat range, reach, design, and gap to the engine specification.
How to Diagnose a No-Spark Problem After Testing
If your spark test shows no spark, do not immediately blame the plug. Start by checking the tester connection and ground. Then follow the ignition circuit from the plug toward the coil and control system, using the service manual for the vehicle.
On a small engine, the ignition coil, stop switch, wiring, ground, and flywheel or related parts can affect spark. On a modern car, the ignition coil, wiring, engine control system, crankshaft position signal, and other components may also matter.
If you have a spark but the engine still will not start, the problem may be elsewhere. Check fuel delivery, air supply, compression, engine timing, and fault codes as appropriate. A spark plug test is one part of diagnosis, not the whole process.
- ✦ No spark at the tester
Check the tester setup, ground, ignition coil, wiring, switches, and other ignition components.
- ✦ Spark is present but the engine will not start
Check fuel, air, compression, timing, and relevant electronic controls.
- ✦ One cylinder misfires
Compare the affected plug and ignition parts with a known-good cylinder when the service procedure allows it.
- ✦ Several cylinders misfire
Look for a system-wide cause such as fuel delivery, ignition power, timing, or another common fault.
When to Stop DIY Testing
Stop and seek professional help if you are unsure about high-voltage ignition work, fuel system hazards, or the correct test procedure. Modern vehicles can also require scan tools and manufacturer-specific procedures.
If a spark plug keeps fouling after replacement, do not keep changing plugs without finding the cause. Repeated fouling can be a symptom of a larger engine, fuel, ignition, or oil-control problem.
- ✦ You are unsure of the procedure
Use a qualified technician when the service instructions are unclear or the required test equipment is unfamiliar.
- ✦ Fuel or electrical hazards are present
Do not continue when there is a fuel leak, strong fuel vapor, damaged wiring, or another immediate hazard.
- ✦ The fault keeps returning
Repeated plug failure calls for deeper diagnosis instead of repeated plug replacement.