
Learning how to use a spark plug gapper is a simple skill that can help with routine car care. A spark plug needs the right gap so the ignition system can create the spark the engine needs. A gap that is too wide or too narrow can affect starting, idle quality, fuel use, and engine response.
The key is to work slowly and use the correct specification. Do not guess the gap by looking at the old plug. Modern plugs can use different gap sizes, and some plugs come pre-gapped for a specific engine. A quick measurement before installation can prevent a small mistake from turning into a rough-running engine.

What Is a Spark Plug Gapper?
A spark plug gapper is a small tool used to measure and adjust the gap between a spark plug’s electrodes. The gap is the space between the center electrode and the ground electrode. This space must match the engine maker’s specification.
Several gap tools exist. Some use a round disk with marked sizes. Others use thin metal blades called feeler gauges. Some tools combine both styles. The basic job stays the same: measure the gap, make a small adjustment when needed, and measure it again.

- ✦ Round wire or disk gapper
A round tool has marked sizes around its edge. You slide the spark plug gap into the marked area to check its size.
- ✦ Feeler gauge
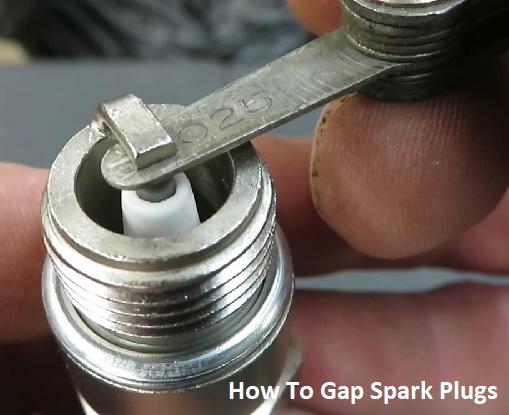
A feeler gauge uses thin metal blades with known thicknesses. Select the blade that matches the required gap.
- ✦ Combination tool
Many common spark plug tools include both measuring blades and a small bending feature for adjusting the ground electrode.
Why the Spark Plug Gap Matters
The spark plug gap affects how the ignition spark jumps from the center electrode to the ground electrode. A wider gap can need more voltage. A smaller gap can make the spark easier to form, but it may not match the engine’s design.
The correct gap depends on the engine, plug, and ignition system. That is why the best way to learn how to use a spark plug gapper starts with finding the exact specification for your vehicle. Use the owner’s manual, service information, or the plug maker’s application data.
- ✦ Gap too wide
A gap that is too wide can make it harder for the ignition system to fire the plug. It may contribute to misfires, especially under load.
- ✦ Gap too narrow
A gap that is too narrow changes the intended spark conditions. It can also reduce the exposed spark area.
- ✦ Correct gap
The specified gap gives the ignition system the conditions the engine maker intended for that plug and engine.
Where to Find the Correct Gap
Check the owner’s manual or reliable service information for your exact engine. You can also check the spark plug manufacturer’s application data. Do not rely only on a generic chart because two engines that use similar plugs can still require different gaps.
- ✦ Use exact engine data
Confirm the year, make, model, engine size, and plug part number before setting the gap.
- ✦ Check the unit
Gap specifications may appear in inches or millimeters. Make sure you are reading the unit correctly before measuring.
What You Need Before You Start
The job needs only a few basic items. Work on a cool engine and keep dirt away from the plug opening. If you are replacing plugs, remove one plug at a time when practical so you can keep track of the ignition wire or coil location.
A clean work area also helps. Dirt or grit around the plug can fall into the cylinder area when the plug is removed. Good basic shop habits matter just as much as knowing how to use a spark plug gapper.

- ✦ Spark plug gapper
Use a gap tool that can measure the range required by your spark plugs.
- ✦ Correct spark plug
Use the plug specified for your engine and verify its part number before installation.
- ✦ Vehicle specification
Have the exact recommended gap available before you adjust anything.
- ✦ Clean work area
Keep the plug and tool clean so dirt does not affect the measurement or enter the engine.
How to Use a Spark Plug Gapper Step by Step
The process is easy once you know what each part of the tool does. The most important rule is to adjust only the ground electrode. The center electrode and the ceramic insulator are not parts you should bend or strike.
When learning how to use a spark plug gapper, make small adjustments and check the measurement often. Trying to make one large bend can damage the plug or leave the electrode out of shape.

- ✦ 1. Find the required gap
Get the exact gap specification for your engine and spark plug. Write it down if needed so you can compare it with your measurement.
- ✦ 2. Inspect the spark plug
Look at the center electrode, ground electrode, ceramic insulator, and threads. Do not use a plug with obvious damage.
- ✦ 3. Place the gapper in the gap
Use the measuring edge, wire, or feeler blade that matches the style of your tool. Position it between the center and ground electrodes without forcing it.
- ✦ 4. Read the measurement
Compare the point where the gauge fits with the required specification. A feeler blade should give a light drag rather than bind tightly.
- ✦ 5. Adjust the ground electrode
If the gap is wrong, use the tool’s adjustment feature to move the ground electrode. Bend it in very small steps.
- ✦ 6. Measure again
Check the gap after each adjustment. Repeat the process until the measurement matches the required specification.
- ✦ 7. Install the plug correctly
Once the gap is correct, install the plug using the proper procedure and torque for your engine. Avoid cross-threading the plug.
How to Measure With a Feeler Gauge
Choose the blade that matches the specified gap. Slide it gently between the electrodes. The correct blade should pass through with slight resistance, not with force.
If the blade will not enter, the gap may be too small. If it moves with almost no resistance, the gap may be too wide. Make a small adjustment and check again.
- ✦ Use light pressure
The blade should measure the gap, not force the electrodes apart.
- ✦ Keep the blade flat
A clean, straight blade helps give a more reliable measurement.
How to Measure With a Round Gapper
A round gapper uses marked sections around the edge of the tool. Place the tool into the gap and move it until the electrode contacts the area marked with the measured value.
Read the mark that matches the point where the ground electrode meets the tool. Use the tool’s adjustment section to make small changes, then measure again.
- ✦ Read the scale carefully
Check whether the markings show inches, millimeters, or another unit before setting the gap.
- ✦ Do not force the plug
The gapper should measure the electrode gap without placing heavy pressure on the plug.
How to Adjust the Spark Plug Gap Safely
The ground electrode is the part you adjust. It curves over the center electrode. The goal is to change its position without bending the electrode from side to side or damaging the plug.
Use controlled pressure. If your gapper has a dedicated bending slot or hook, use that feature. Avoid hitting the plug against a hard surface because impact can damage the ceramic or distort the electrode.

- ✦ To make the gap smaller
Apply gentle pressure to move the ground electrode closer to the center electrode. Make small changes and measure again.
- ✦ To make the gap larger
Use the gapper’s designed adjustment feature to lift the ground electrode slightly. Do not pry against the center electrode.
- ✦ Protect the center electrode
Never use the center electrode as a lever point. It can be damaged or misaligned.
- ✦ Inspect after adjustment
Make sure the ground electrode remains centered over the center electrode and that the plug has no visible damage.
Why Small Adjustments Work Better
A spark plug electrode does not need a large movement to change the gap. Small bends make it easier to reach the target without going too far. This also makes the final measurement more accurate.
A good habit is to adjust, measure, and repeat. That simple cycle is safer than trying to guess the final position.
Common Mistakes When Using a Spark Plug Gapper
Most spark plug gapping errors come from rushing the measurement or using the wrong reference value. A tool can be simple to use, but the measurement still needs care.
Avoid treating a spark plug gapper as a tool that lets you bend the plug any way you want. The ground electrode is designed to be adjusted within reason. Excessive force can cause damage.
- ✦ Guessing the gap
Do not estimate the gap by eye. Use the exact specification for the vehicle and plug.
- ✦ Bending the center electrode
The center electrode should not be used as the adjustment point. Work only with the ground electrode.
- ✦ Making one large adjustment
Large movements make it easy to overshoot the target and can damage the electrode.
- ✦ Skipping the final check
Always measure the gap again after adjustment. The electrode can move farther than expected during bending.
- ✦ Using a damaged gauge
Bent, worn, or dirty measuring surfaces can make readings less reliable.
- ✦ Forcing a feeler blade
A blade should not be pushed hard into a gap. Heavy pressure can change the gap while you are trying to measure it.
Should You Gap New Spark Plugs?
New spark plugs often come with a preset gap, but that does not mean you should skip checking it. The gap can vary by application, and a plug may have been moved or handled before installation.
The safest approach is to compare the new plug with the exact specification for your engine. If the gap is correct, leave it alone. If it is wrong, adjust it only if the plug maker allows adjustment and the plug design supports it.

- ✦ Check first
Measure a new plug before installing it when the application calls for a specific gap.
- ✦ Do not assume every plug needs adjustment
A correctly gapped plug does not need to be changed just because you have a gap tool.
- ✦ Follow plug maker guidance
Some specialized plugs have electrode designs that require extra care. Follow the instructions for that specific plug.
Pre-Gapped Does Not Mean Verify-Never
The term pre-gapped means the plug was supplied with a set electrode spacing. It does not replace checking the application data. A quick measurement can catch an incorrect plug or a gap that changed during handling.
Spark Plug Gapping Tools and Their Limits
A basic spark plug gapper is useful for many standard spark plugs. It is small, cheap, and easy to keep in a home garage or tool box. For routine maintenance, it can be all you need.
Still, the tool has limits. A simple gapper does not tell you whether a plug is the right heat range, whether the electrode is worn, or whether the engine has another ignition problem. It only helps you measure and adjust the electrode gap.
- ✦ What it can do
It can measure the electrode gap and, on many models, help adjust the ground electrode.
- ✦ What it cannot do
It cannot diagnose every misfire, prove that a spark plug is healthy, or replace the vehicle maker’s service information.
- ✦ When a professional check helps
If the engine still misfires after correct plug installation, the issue may involve ignition coils, wiring, fuel, compression, sensors, or another system.
How to Use a Spark Plug Gapper for Routine Maintenance
For a typical U.S. driver, spark plug work often comes up during scheduled maintenance or when an engine develops a starting or running problem. Before removing plugs, let the engine cool and follow the vehicle service instructions.
A good routine is simple: confirm the plug number, confirm the required gap, inspect the plug, measure the gap, adjust only when needed, and install the plug with the correct procedure. This keeps the job controlled and reduces avoidable errors.
- ✦ Before removal
Let the engine cool and clean loose dirt around the plug area.
- ✦ Before adjustment
Confirm the correct plug and gap specification.
- ✦ Before installation
Measure the final gap and inspect the electrode and ceramic for damage.
- ✦ After installation
Start the engine and watch for rough running, warning lights, or other signs that need further diagnosis.
A Practical Garage Habit
When working on several cylinders, keep removed parts organized by location when the service procedure allows it. Do not mix up ignition coils, connectors, or plug locations. Small habits like this make a simple repair easier to check.