
Learning how to read spark plugs for tuning gives you a simple way to inspect what happens inside an engine. A spark plug sits in the combustion chamber, so its firing end can show clues about fuel, heat, ignition, and oil. It cannot tell the whole story by itself, but it can help you spot a problem before it becomes expensive.
The key is to avoid judging a plug from color alone. Modern fuels, additives, engine design, fuel injection, ignition systems, and driving conditions can all change what you see. A good tune uses plug reading as one piece of evidence, not as the only test.
This guide explains how to read spark plugs for tuning on gasoline engines, including what normal wear looks like, what rich and lean conditions can look like, how heat range affects the plug, and how to perform a useful plug check. The same basic ideas can help with street cars, track cars, motorcycles, and older carbureted engines.

What Spark Plugs Can Tell You About an Engine
A spark plug can show signs of how the cylinder has been operating. Look at the insulator nose, center electrode, ground electrode, and the area around the firing end. Deposits, color, wear, and heat damage can point to different engine conditions.
When learning how to read spark plugs for tuning, think in terms of clues rather than fixed color rules. A plug that looks slightly different from a chart is not automatically a problem. The best diagnosis comes from the plug’s condition plus the engine’s fuel, ignition, temperature, and mechanical data.
Spark plugs also record the conditions they have seen over time. A long period of idling can leave very different deposits from a short high-load pull. That is why a plug removed after normal street driving may not give a clean picture of what happened at wide-open throttle.

- ✦ Fuel mixture
Deposits can provide clues about whether combustion has been rich, clean, or unusually lean.
- ✦ Heat
The firing end can show signs of overheating, such as a very white insulator, blistering, or electrode damage.
- ✦ Ignition
Plug condition can help reveal problems linked to ignition timing, weak spark, or poor combustion.
- ✦ Engine condition
Oil deposits, wet fuel, unusual ash, or uneven plug appearance can point to mechanical or fuel-system issues.
The Main Parts to Inspect
Start with the ceramic insulator around the center electrode. Then inspect the center electrode, ground electrode, and firing-end deposits. Also look for cracks, melted metal, pitting, heavy ash, and oil.
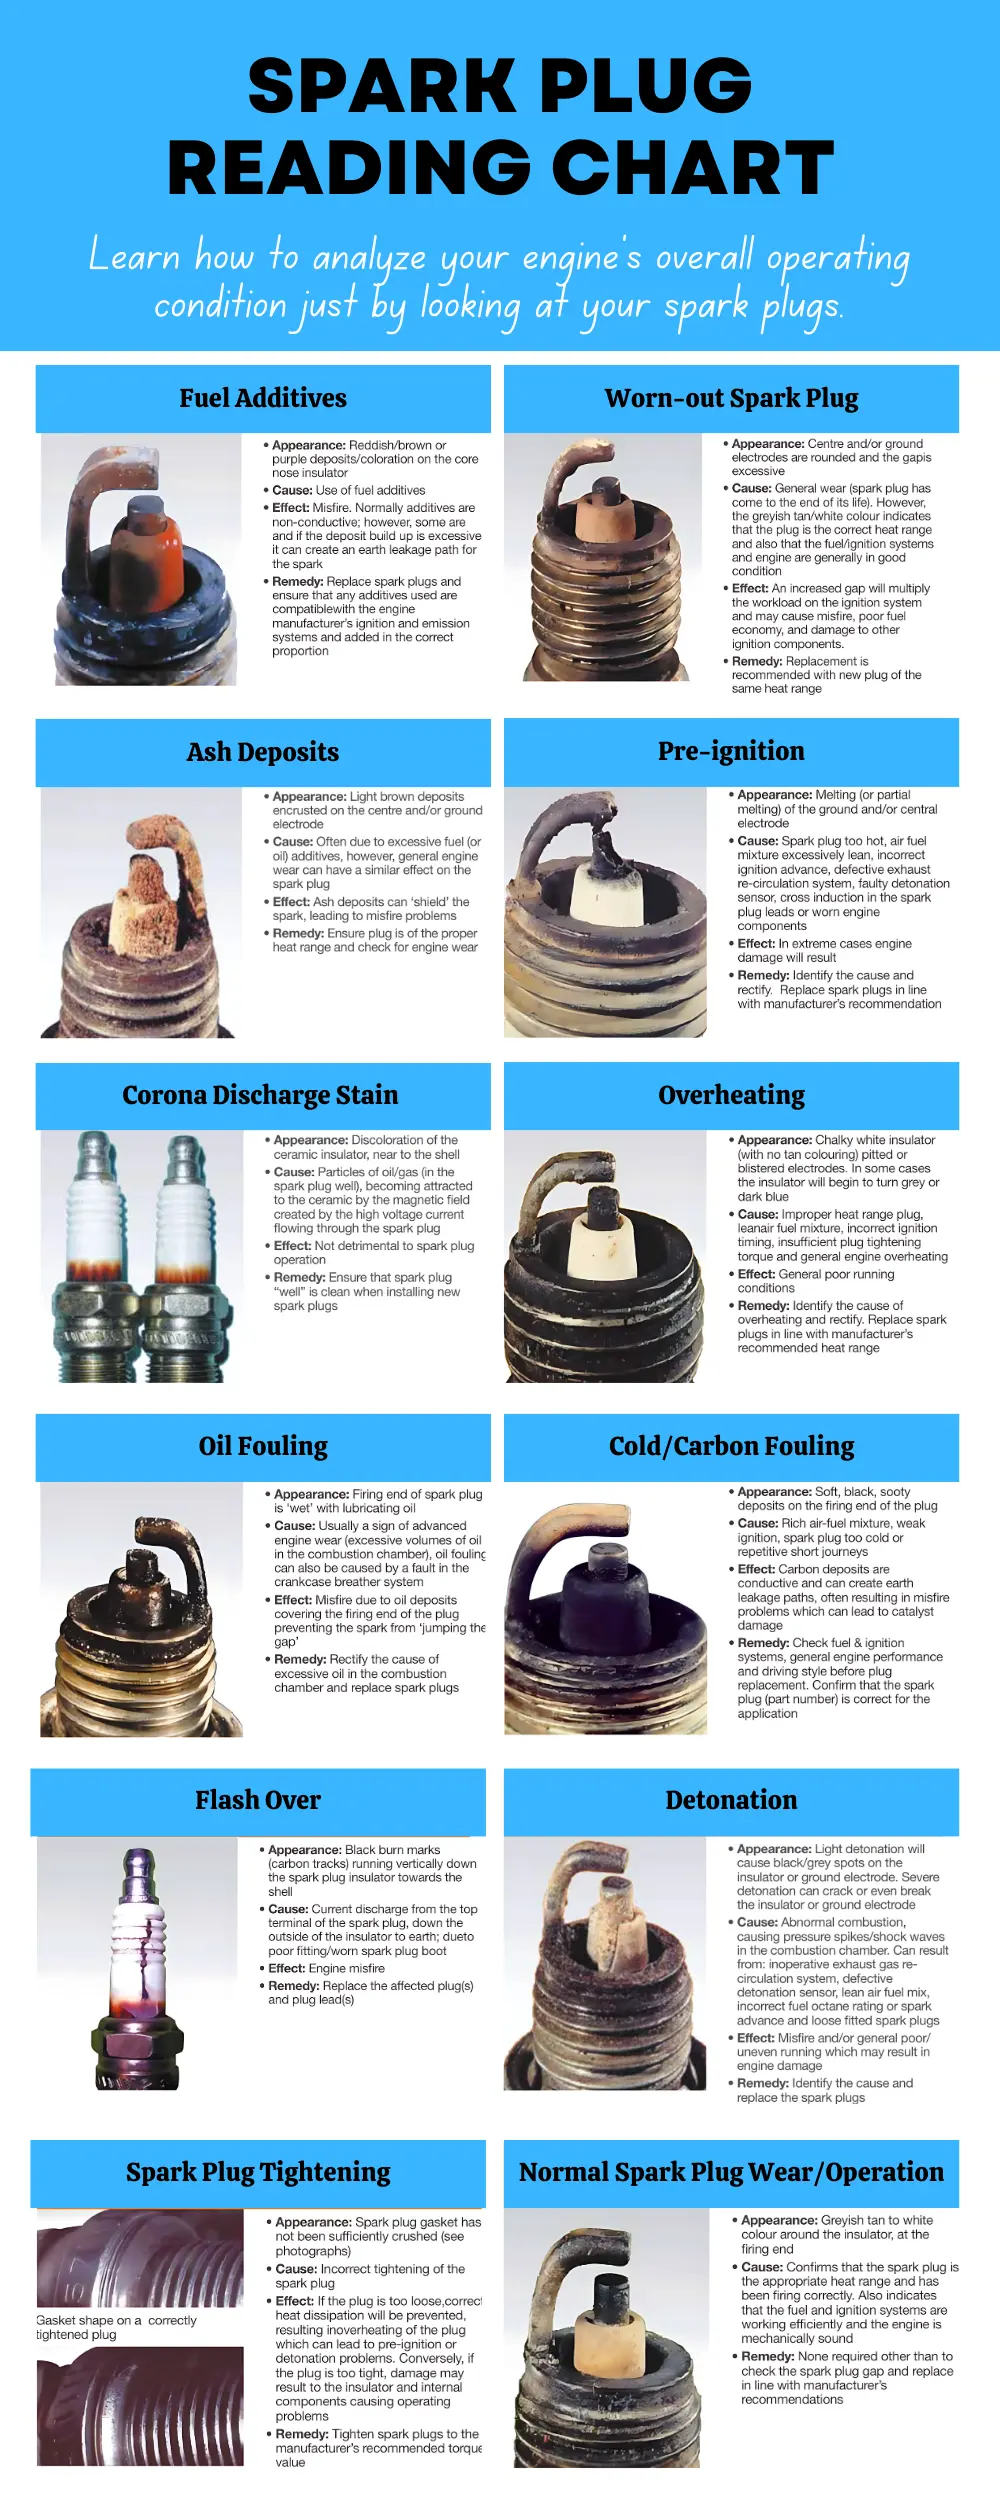
The side of the ceramic near the metal shell can also show marks that are not directly related to mixture. For example, a vertical black carbon track can indicate an ignition leakage problem rather than a fuel problem.
- ✦ Insulator nose
Check its color, deposits, cracks, and signs of excessive heat.
- ✦ Center electrode
Look for normal wear, rounding, melting, or unusual deposits.
- ✦ Ground electrode
Check for erosion, overheating, pitting, or melting.
- ✦ Metal shell
Look for oil, fuel, corrosion, and signs of incorrect installation.
How to Read Spark Plugs for Tuning Step by Step
The first step in learning how to read spark plugs for tuning is to start with the correct plug. Confirm the part number, thread size, reach, electrode type, and heat range for the engine. A wrong plug can create symptoms that look like a tuning problem.
Next, make sure the engine is in a known state. Record the fuel being used, approximate engine temperature, ignition settings, and any recent changes. If the engine has adjustable fuel or ignition controls, change one major setting at a time so you can connect a result to a change.
For a focused high-load check, use a controlled test rather than relying on an old plug that has seen days of mixed driving. Follow safe testing rules for your vehicle and location. After the test, inspect the plugs while the evidence is still useful.
Do not touch a hot spark plug with bare hands. Let the engine and parts cool enough for safe handling, and use the correct tools. Spark plugs can be damaged by incorrect removal or installation.

- ✦ 1. Confirm the plug
Verify the correct plug type, heat range, reach, and gap for the engine.
- ✦ 2. Establish a baseline
Record the current fuel, timing, boost if applicable, engine temperature, and other important settings.
- ✦ 3. Run a controlled test
Use a repeatable load and operating condition that matches the part of the engine map you want to evaluate.
- ✦ 4. Remove and inspect
Inspect the firing end for color, deposits, heat damage, electrode wear, and oil or fuel contamination.
- ✦ 5. Compare cylinders
Look at all plugs when possible. One cylinder that looks very different can reveal a cylinder-specific problem.
- ✦ 6. Confirm with other data
Use a wideband oxygen sensor, scan data, temperature data, compression testing, or other suitable tests to confirm the diagnosis.
Why the Test Method Matters
A plug used for a short, hard pull tells a different story from one used for commuting. Idling, cold starts, short trips, and low-speed driving can create deposits that hide the condition you want to study.
For this reason, how to read spark plugs for tuning is partly about controlling the test. The more consistent the engine speed, load, temperature, and test duration, the easier it is to compare one plug reading with another.
- ✦ Use repeatable conditions
Keep the test method as consistent as possible when comparing changes.
- ✦ Avoid mixed evidence
Do not use a plug with weeks of mixed street driving as proof of one short tuning event.
What a Normal Spark Plug Looks Like
A healthy spark plug often has a clean firing end with light gray, tan, or similar normal-looking deposits. The exact shade can vary with the fuel, engine, plug design, and operating conditions. Modern engines do not always produce the classic light tan color shown in older tuning guides.
The electrodes should show normal wear rather than melting, severe rounding, or heavy erosion. The ceramic should not show cracks or obvious signs of extreme heat.
A normal-looking plug does not prove that every part of the tune is perfect. It simply means the plug does not show obvious signs of a major problem. For precise tuning, use it with other measurements.

- ✦ Light deposits
Light gray or tan deposits can be consistent with normal operation.
- ✦ Healthy electrodes
Electrodes should not be melted, badly pitted, or excessively worn.
- ✦ Clean ceramic
The insulator should not have heavy oil, wet fuel, or severe carbon deposits.
- ✦ Similar cylinders
Plugs that look broadly similar can suggest that the cylinders are operating under similar conditions.
Do Not Chase One Exact Color
One of the most common mistakes in spark plug reading is treating one color as a universal target. Fuel chemistry and modern combustion systems make simple color charts less exact than many older tuning books suggest.
Instead, look for abnormal conditions. Very heavy soot, oil, wet fuel, blistering, melted electrodes, or severe deposits deserve more attention than a small change in tan or gray color.
- ✦ Use color as a clue
Color can support a diagnosis, but it should not be the only reason for a tuning change.
- ✦ Focus on damage
Heat damage, melting, cracking, and severe deposits are more important warning signs.
Reading Black or Carbon-Fouled Spark Plugs
Dry, soft, black soot on the firing end is commonly linked with carbon fouling. A rich air-fuel mixture is one possible cause, but it is not the only one. Weak ignition, an incorrect heat range, dirty intake or fuel-system parts, repeated short trips, and extended idling can also contribute.
When learning how to read spark plugs for tuning, do not immediately reduce fuel because one plug is black. First ask whether the ignition system is strong, the plug is correct, the engine reaches normal temperature, and the cylinder has good mechanical health.
If all cylinders show similar dry black deposits, a shared fuel or ignition issue becomes more plausible. If one plug is much darker than the others, look for a cylinder-specific issue.

- ✦ Rich mixture
Too much fuel for the available air can leave black carbon deposits.
- ✦ Weak ignition
A weak spark can allow incomplete combustion and create soot.
- ✦ Too-cold plug
A plug that runs too cool may not burn deposits away well.
- ✦ Short-trip use
Repeated cold starts and short drives can create deposits that do not represent high-load operation.
Black Does Not Always Mean Rich
This is an important point when you learn how to read spark plugs for tuning. A black plug can result from a rich mixture, but it can also come from weak spark or poor operating conditions.
Check ignition components, fuel delivery, plug heat range, engine temperature, and driving conditions before changing the fuel map. This prevents a tuning change from masking the real fault.
- ✦ Check ignition first
Inspect coils, wires where fitted, boots, connections, and plug condition if combustion appears weak.
- ✦ Check operating conditions
Consider whether the engine was cold, idling, or used mainly for short trips.
Reading White, Blistered, or Overheated Spark Plugs
A very white firing end can be a warning when it appears with other signs of excessive heat. Look for a chalky insulator, blistering, pitting, or damaged electrodes. These signs can occur with a lean mixture, incorrect ignition timing, an unsuitable heat range, cooling problems, or incorrect plug installation.
This is one of the most important parts of how to read spark plugs for tuning because excessive combustion heat can cause serious engine damage. Do not keep increasing load when a plug shows clear heat damage.
A hot-looking plug does not prove that the mixture is lean. Ignition timing, cooling, plug heat range, exhaust restrictions, and installation torque can also affect plug temperature. Find the cause before making a fuel change.
- ✦ Chalky white insulator
A very white firing end can be associated with an overheated plug, especially when other heat damage is present.
- ✦ Blistered ceramic
Blistering can indicate excessive heat and should not be ignored.
- ✦ Pitted electrode
Pitting or unusual electrode wear can be a sign that the plug has experienced severe conditions.
- ✦ Melted electrode
A melted or partially melted electrode is a serious warning that requires immediate diagnosis.
Lean Mixture Versus Excess Timing
A lean mixture and excessive ignition advance can both increase combustion temperature. That means a plug alone may not tell you which adjustment caused the problem.
Use fuel pressure checks, injector data, air-fuel readings, ignition data, engine temperature data, and knock monitoring where available. Make small changes only after you understand the evidence.
- ✦ Check fuel delivery
Confirm that the engine receives the expected fuel volume and pressure under load.
- ✦ Check ignition timing
Verify commanded and actual timing before assuming the fuel mixture is the only cause.
- ✦ Check cooling
An overheating engine can make the plug look like it has a tuning problem.
How Spark Plugs Show Ignition Timing Problems
Ignition timing changes combustion temperature and pressure. Too much advance can increase heat and create conditions that support detonation or pre-ignition. A plug may show heat damage, unusual deposits, or electrode damage when the engine has been exposed to severe combustion conditions.
When you learn how to read spark plugs for tuning, remember that plug evidence is often delayed or indirect. Modern engines may use knock sensors and electronic controls that change timing as conditions change. The spark plug may show the result, but it may not identify the exact timing value that caused it.
If a plug shows signs of detonation or severe overheating, stop the test and investigate. Continuing to make high-load runs can turn a warning into piston, valve, or plug damage.

- ✦ Excessive advance
Too much ignition advance can raise combustion temperature and increase the risk of abnormal combustion.
- ✦ Detonation clues
Dark or damaged areas, cracked ceramic, or damaged electrodes can occur with severe abnormal combustion.
- ✦ Pre-ignition clues
Severe heat damage and melting can occur when combustion starts too early or the chamber becomes extremely hot.
- ✦ Verify with data
Use ignition logs and suitable knock monitoring rather than relying on plug appearance alone.
Detonation and Pre-Ignition Are Not the Same
Detonation is abnormal combustion that creates rapid pressure changes after the normal flame has started. Pre-ignition happens when the mixture starts burning before the intended spark event. Both can create severe heat and engine stress.
Because the results can overlap, a damaged plug should trigger a full diagnosis. Do not assume that one plug color identifies one exact failure.
- ✦ Detonation
Can produce severe pressure and heat, with possible damage to the plug and engine.
- ✦ Pre-ignition
Can create a rapid temperature rise and may melt or damage electrodes.
Spark Plug Heat Range and Why It Matters
Spark plug heat range describes how quickly the plug transfers heat away from its firing end. A hotter plug keeps more heat at the tip, while a colder plug transfers heat away faster. Heat range is not the same as the temperature of the spark itself.
A plug that is too cold may foul more easily because it does not stay hot enough to burn deposits away. A plug that is too hot can contribute to excessive tip temperature, electrode wear, pre-ignition risk, or other problems.
When learning how to read spark plugs for tuning, do not use a hotter or colder plug as a shortcut for correcting a fuel map. Heat range is a hardware choice. Fuel and ignition settings are separate parts of the tune.

- ✦ Hot plug
Transfers heat more slowly and can help resist fouling in applications that need a hotter firing end.
- ✦ Cold plug
Transfers heat faster and can be useful in engines that create high heat at high load.
- ✦ Too cold
Can encourage carbon fouling and misfire if the firing end stays too cool.
- ✦ Too hot
Can raise firing-end temperature and increase the risk of overheating and abnormal combustion.
When Should You Change Heat Range?
For a stock engine, the manufacturer’s specified plug is normally the correct starting point. Modified engines may need a different heat range because changes in boost, compression, engine speed, fuel, or combustion temperature can alter plug operating conditions.
Change heat range based on the engine’s actual needs and plug evidence, not simply because the engine has more power. The correct choice also depends on the exact plug family because numbering systems differ between manufacturers.
- ✦ Start with the recommended plug
Use the manufacturer’s specification unless there is a clear technical reason to change it.
- ✦ Consider engine changes
Boost, compression, fuel type, RPM, and operating temperature can affect the appropriate heat range.
- ✦ Follow the plug maker’s system
Do not assume a higher or lower number means the same heat change across different brands.
Reading Oil-Fouled, Wet, and Ash-Covered Plugs
Not every bad-looking plug is a tuning problem. Oily deposits can point to oil entering the combustion chamber. Wet fuel can occur after flooding or a failed start. Ash deposits may come from fuel or oil additives or from engine wear.
This matters because changing the fuel map will not repair worn rings, valve seals, a leaking injector, or another mechanical fault. A plug can show the symptom while the real cause sits elsewhere.
If one cylinder has a wet or oily plug while the others look normal, focus on that cylinder. Compression testing, leak-down testing, injector checks, and inspection of the ignition system can help separate mechanical problems from fuel or spark problems.
- ✦ Oil fouling
Wet or oily deposits can indicate that engine oil is reaching the combustion chamber.
- ✦ Fuel wetness
A wet plug can result from flooding or an engine that received fuel without proper combustion.
- ✦ Ash deposits
Light-colored or unusual deposits can be linked to additives or engine wear and can interfere with spark performance.
- ✦ Cylinder imbalance
One plug that looks very different from the others can point to a cylinder-specific problem.
When a Plug Is Telling You to Stop Tuning
Stop making aggressive tuning runs when you see melted electrodes, cracked ceramic, severe overheating, or clear signs of abnormal combustion. These are not normal signs that simply call for another fuel adjustment.
The safer approach is to find the cause first. Check the plug specification, fuel system, ignition system, cooling system, engine condition, and tune before returning to high-load testing.
- ✦ Severe heat damage
Treat melting, blistering, or heavy pitting as a warning that needs diagnosis.
- ✦ Cracked ceramic
Replace the damaged plug and investigate the cause before further testing.
- ✦ Repeated plug failure
Repeated damage suggests an unresolved engine, ignition, fuel, cooling, or installation problem.
How to Read Spark Plugs for Tuning With Modern Fuel Injection
Modern fuel-injected engines give you more data than older carbureted engines. A wideband oxygen sensor, scan tool, fuel trims, intake air temperature, coolant temperature, ignition timing, and knock information can all add useful context.
This changes how to read spark plugs for tuning. The plug is still useful, but it should support measured data rather than replace it. If the plug looks clean while the engine log shows a serious fuel or timing issue, trust the complete set of evidence.
Closed-loop fuel control can also change the mixture during normal driving. That makes a plug removed after everyday use less useful for judging one high-load part of the tune.
- ✦ Wideband air-fuel data
Provides direct information about exhaust oxygen and helps verify fueling under controlled conditions.
- ✦ Fuel trims
Can show how much the engine control system is correcting fueling during conditions where closed-loop control is active.
- ✦ Ignition data
Shows commanded timing and can help connect plug heat signs with the ignition strategy.
- ✦ Knock data
Can provide an important warning about abnormal combustion, although the exact meaning depends on the system and its calibration.
Why Plug Reading Still Matters
Sensors can tell you what the engine computer measured. A plug can show physical evidence of what happened at the firing end. Those two forms of evidence can work well together.
For example, if logs show a lean condition and the plug also shows signs of excessive heat, the two findings support further investigation. If they disagree, do more testing instead of forcing the plug into the expected answer.
- ✦ Use multiple signals
Combine physical inspection with measured engine data.
- ✦ Record changes
Keep notes of fuel, timing, boost, temperature, plug type, and test conditions.
Common Mistakes When Reading Spark Plugs for Tuning
The biggest mistake is making a large tuning change from one plug. A single plug can be affected by ignition faults, oil, injector problems, heat range, installation, or the way the vehicle was driven.
Another common mistake is assuming that a white plug always means lean and a black plug always means rich. These are useful clues, but each condition has several possible causes.
Good tuning is controlled and repeatable. Make one change, test under the same conditions, inspect the evidence, and use supporting measurements before making the next change.
- ✦ Mistake: using old street plugs
Mixed driving can leave deposits that do not represent one tuning condition.
- ✦ Mistake: changing several settings at once
Multiple changes make it difficult to know which adjustment caused the result.
- ✦ Mistake: ignoring the plug number
A plug with the wrong reach, heat range, gap, or design can create misleading symptoms.
- ✦ Mistake: ignoring cylinder differences
One unusual plug can point to a local cylinder problem rather than a global tune.
- ✦ Mistake: tuning by color alone
Plug color is only one clue and can be affected by fuel, additives, load, temperature, and engine design.
- ✦ Mistake: continuing after damage appears
Melted, cracked, or badly overheated plugs should lead to diagnosis before more hard testing.
A Better Tuning Routine
A repeatable routine makes spark plug reading much more useful. Start with a known-good plug and known engine settings. Record the conditions before the test, then change one major variable at a time.
After each test, inspect the plugs and compare the physical evidence with your measured data. This process helps prevent guesswork and makes it easier to find trends across multiple runs.
- ✦ Baseline
Begin with known plug specifications and stable engine settings.
- ✦ Test
Use a safe and repeatable load condition.
- ✦ Inspect
Read all accessible plugs and record unusual findings.
- ✦ Verify
Compare plug evidence with air-fuel, timing, temperature, and other available data.
- ✦ Adjust
Make a small, controlled change only when the evidence supports it.
Tools That Make Spark Plug Reading Easier
You do not need a large shop to inspect spark plugs, but the right tools make the job safer and more accurate. A good spark plug socket, torque wrench, gap gauge, inspection light, and basic hand tools cover much of the work.
For performance tuning, more data can greatly improve the diagnosis. A wideband oxygen sensor, scan tool, timing information, temperature data, and suitable knock monitoring can help confirm what the plug suggests.
Keep the plug type and gap within the engine or plug manufacturer’s specification. Never use a tuning change to compensate for a basic installation problem.
- ✦ Spark plug socket
Use the correct socket to reduce the chance of damaging the plug during removal.
- ✦ Torque wrench
Install plugs to the manufacturer’s specified torque so heat transfer and sealing are correct.
- ✦ Gap gauge
Check the electrode gap against the required specification.
- ✦ Inspection light
A bright light helps reveal deposits, cracks, and electrode damage.
- ✦ Wideband oxygen sensor
Provides useful air-fuel information that can support plug observations.
- ✦ Scan and logging tools
Help compare plug condition with timing, temperature, fuel corrections, and other engine data.
Spark Plug Gap Is Part of the Diagnosis
The gap affects the voltage needed to jump between the electrodes. A gap that is too wide can place more demand on the ignition system, while an incorrect gap can contribute to misfire or poor combustion.
Always check the required gap for the exact plug and engine. Do not copy a gap from another vehicle just because the plug looks similar.
- ✦ Check before installation
Verify the gap against the exact engine and plug specification.
- ✦ Inspect used plugs
An increased gap can show normal wear and may increase ignition-system demand.